WBlog

wangzhiwei blog

0%

tfjs-study2

手写数字识别 - 使用卷积神经网络

为什么要用卷积神经网络?

图片数据量大,运算量大, 200 * 200 * 3 = 120,000

卷积神经网络模拟人类视觉处理流程,高效提取特征

卷积神经网络的层

卷积层:提取特征

跟着 image kernels (卷积核) 了解卷积运算

https://setosa.io/ev/image-kernels/

使用多个卷积核(filter/ kernel)对图像进行卷积操作

https://cs231n.github.io/convolutional-networks/

卷积层有权重需要需要训练,卷积核就是权重

池化层:用于提取最强的特征,扩大感受野,减少计算量,没有权重需要训练

全连接层: 作为输出层,作为分类器,有权重需要训练

relu : 从 0 和 x 中选择最大的,小于0 的部分变成 0,大于0 的部分不变

http-server -p 8080 –cors

data.js

1
2
3
4
5
6
7
8
9
10
11
12
13
14
15
16
17
18
19
20
21
22
23
24
25
26
27
28
29
30
31
32
33
34
35
36
37
38
39
40
41
42
43
44
45
46
47
48
49
50
51
52
53
54
55
56
57
58
59
60
61
62
63
64
65
66
67
68
69
70
71
72
73
74
75
76
77
78
79
80
81
82
83
84
85
86
87
88
89
90
91
92
93
94
95
96
97
98
99
100
101
102
103
104
105
106
107
108
109
110
111
112
113
114
115
116
117
118
119
120
121
122
123
124
125
126
127
128
129
130
131
132
133
134
135
136
137
138
139
140
141
142
143
144
145
146
147
/**
* @license
* Copyright 2018 Google LLC. All Rights Reserved.
* Licensed under the Apache License, Version 2.0 (the "License");
* you may not use this file except in compliance with the License.
* You may obtain a copy of the License at
*
* http://www.apache.org/licenses/LICENSE-2.0
*
* Unless required by applicable law or agreed to in writing, software
* distributed under the License is distributed on an "AS IS" BASIS,
* WITHOUT WARRANTIES OR CONDITIONS OF ANY KIND, either express or implied.
* See the License for the specific language governing permissions and
* limitations under the License.
* =============================================================================
*/

import * as tf from '@tensorflow/tfjs';

const IMAGE_SIZE = 784;
const NUM_CLASSES = 10;
const NUM_DATASET_ELEMENTS = 65000;

const TRAIN_TEST_RATIO = 5 / 6;

const NUM_TRAIN_ELEMENTS = Math.floor(TRAIN_TEST_RATIO * NUM_DATASET_ELEMENTS);
const NUM_TEST_ELEMENTS = NUM_DATASET_ELEMENTS - NUM_TRAIN_ELEMENTS;

const MNIST_IMAGES_SPRITE_PATH =
'http://127.0.0.1:8080/mnist/mnist_images.png';
const MNIST_LABELS_PATH =
'http://127.0.0.1:8080/mnist/mnist_labels_uint8';

/**
* A class that fetches the sprited MNIST dataset and returns shuffled batches.
*
* NOTE: This will get much easier. For now, we do data fetching and
* manipulation manually.
*/
export class MnistData {
constructor() {
this.shuffledTrainIndex = 0;
this.shuffledTestIndex = 0;
}

async load() {
// Make a request for the MNIST sprited image.
const img = new Image();
const canvas = document.createElement('canvas');
const ctx = canvas.getContext('2d');
const imgRequest = new Promise((resolve, reject) => {
img.crossOrigin = '';
img.onload = () => {
img.width = img.naturalWidth;
img.height = img.naturalHeight;

const datasetBytesBuffer =
new ArrayBuffer(NUM_DATASET_ELEMENTS * IMAGE_SIZE * 4);

const chunkSize = 5000;
canvas.width = img.width;
canvas.height = chunkSize;

for (let i = 0; i < NUM_DATASET_ELEMENTS / chunkSize; i++) {
const datasetBytesView = new Float32Array(
datasetBytesBuffer, i * IMAGE_SIZE * chunkSize * 4,
IMAGE_SIZE * chunkSize);
ctx.drawImage(
img, 0, i * chunkSize, img.width, chunkSize, 0, 0, img.width,
chunkSize);

const imageData = ctx.getImageData(0, 0, canvas.width, canvas.height);

for (let j = 0; j < imageData.data.length / 4; j++) {
// All channels hold an equal value since the image is grayscale, so
// just read the red channel.
datasetBytesView[j] = imageData.data[j * 4] / 255;
}
}
this.datasetImages = new Float32Array(datasetBytesBuffer);

resolve();
};
img.src = MNIST_IMAGES_SPRITE_PATH;
});

const labelsRequest = fetch(MNIST_LABELS_PATH);
const [imgResponse, labelsResponse] =
await Promise.all([imgRequest, labelsRequest]);

this.datasetLabels = new Uint8Array(await labelsResponse.arrayBuffer());

// Create shuffled indices into the train/test set for when we select a
// random dataset element for training / validation.
this.trainIndices = tf.util.createShuffledIndices(NUM_TRAIN_ELEMENTS);
this.testIndices = tf.util.createShuffledIndices(NUM_TEST_ELEMENTS);

// Slice the the images and labels into train and test sets.
this.trainImages =
this.datasetImages.slice(0, IMAGE_SIZE * NUM_TRAIN_ELEMENTS);
this.testImages = this.datasetImages.slice(IMAGE_SIZE * NUM_TRAIN_ELEMENTS);
this.trainLabels =
this.datasetLabels.slice(0, NUM_CLASSES * NUM_TRAIN_ELEMENTS);
this.testLabels =
this.datasetLabels.slice(NUM_CLASSES * NUM_TRAIN_ELEMENTS);
}

nextTrainBatch(batchSize) {
return this.nextBatch(
batchSize, [this.trainImages, this.trainLabels], () => {
this.shuffledTrainIndex =
(this.shuffledTrainIndex + 1) % this.trainIndices.length;
return this.trainIndices[this.shuffledTrainIndex];
});
}

nextTestBatch(batchSize) {
return this.nextBatch(batchSize, [this.testImages, this.testLabels], () => {
this.shuffledTestIndex =
(this.shuffledTestIndex + 1) % this.testIndices.length;
return this.testIndices[this.shuffledTestIndex];
});
}

nextBatch(batchSize, data, index) {
const batchImagesArray = new Float32Array(batchSize * IMAGE_SIZE);
const batchLabelsArray = new Uint8Array(batchSize * NUM_CLASSES);

for (let i = 0; i < batchSize; i++) {
const idx = index();

const image =
data[0].slice(idx * IMAGE_SIZE, idx * IMAGE_SIZE + IMAGE_SIZE);
batchImagesArray.set(image, i * IMAGE_SIZE);

const label =
data[1].slice(idx * NUM_CLASSES, idx * NUM_CLASSES + NUM_CLASSES);
batchLabelsArray.set(label, i * NUM_CLASSES);
}

const xs = tf.tensor2d(batchImagesArray, [batchSize, IMAGE_SIZE]);
const labels = tf.tensor2d(batchLabelsArray, [batchSize, NUM_CLASSES]);

return {xs, labels};
}
}

script.js

1
2
3
4
5
6
7
8
9
10
11
12
13
14
15
16
17
18
19
20
21
22
23
24
25
26
27
28
29
30
31
32
33
34
35
36
37
38
39
40
41
42
43
44
45
46
47
48
49
50
51
52
53
54
55
56
57
58
59
60
61
62
63
64
65
66
67
68
69
70
71
72
73
74
75
76
77
78
79
80
81
82
83
84
85
86
87
88
89
90
91
92
93
94
95
96
97
98
99
100
101
102
103
104
105
106
107
108
109
110
111
112
113
114
115
116
117
118
119
120
121
122
123
124
125
126
127
128
129
130
131
132
133
134
135
136
import * as tf from '@tensorflow/tfjs';
import * as tfvis from '@tensorflow/tfjs-vis';
import { MnistData } from './data';

window.onload = async () => {
const data = new MnistData();
await data.load();
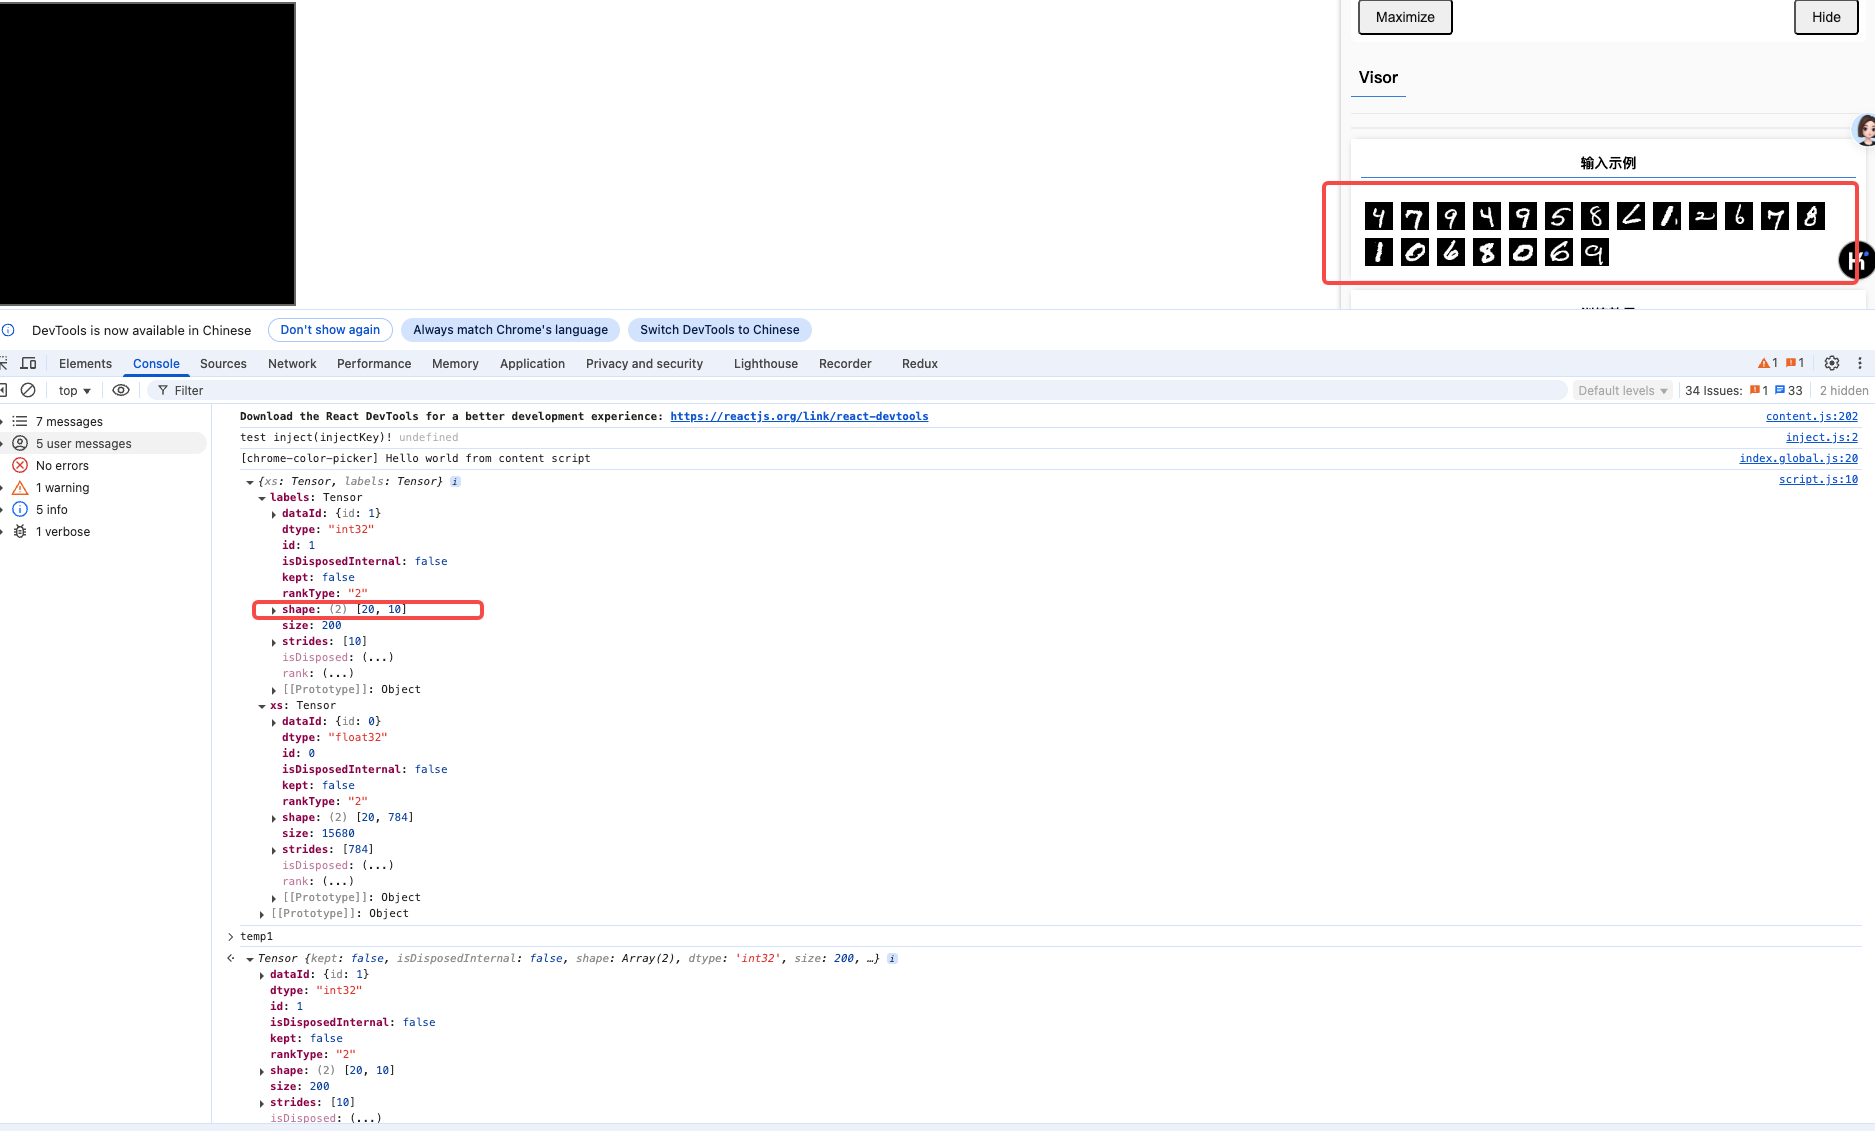
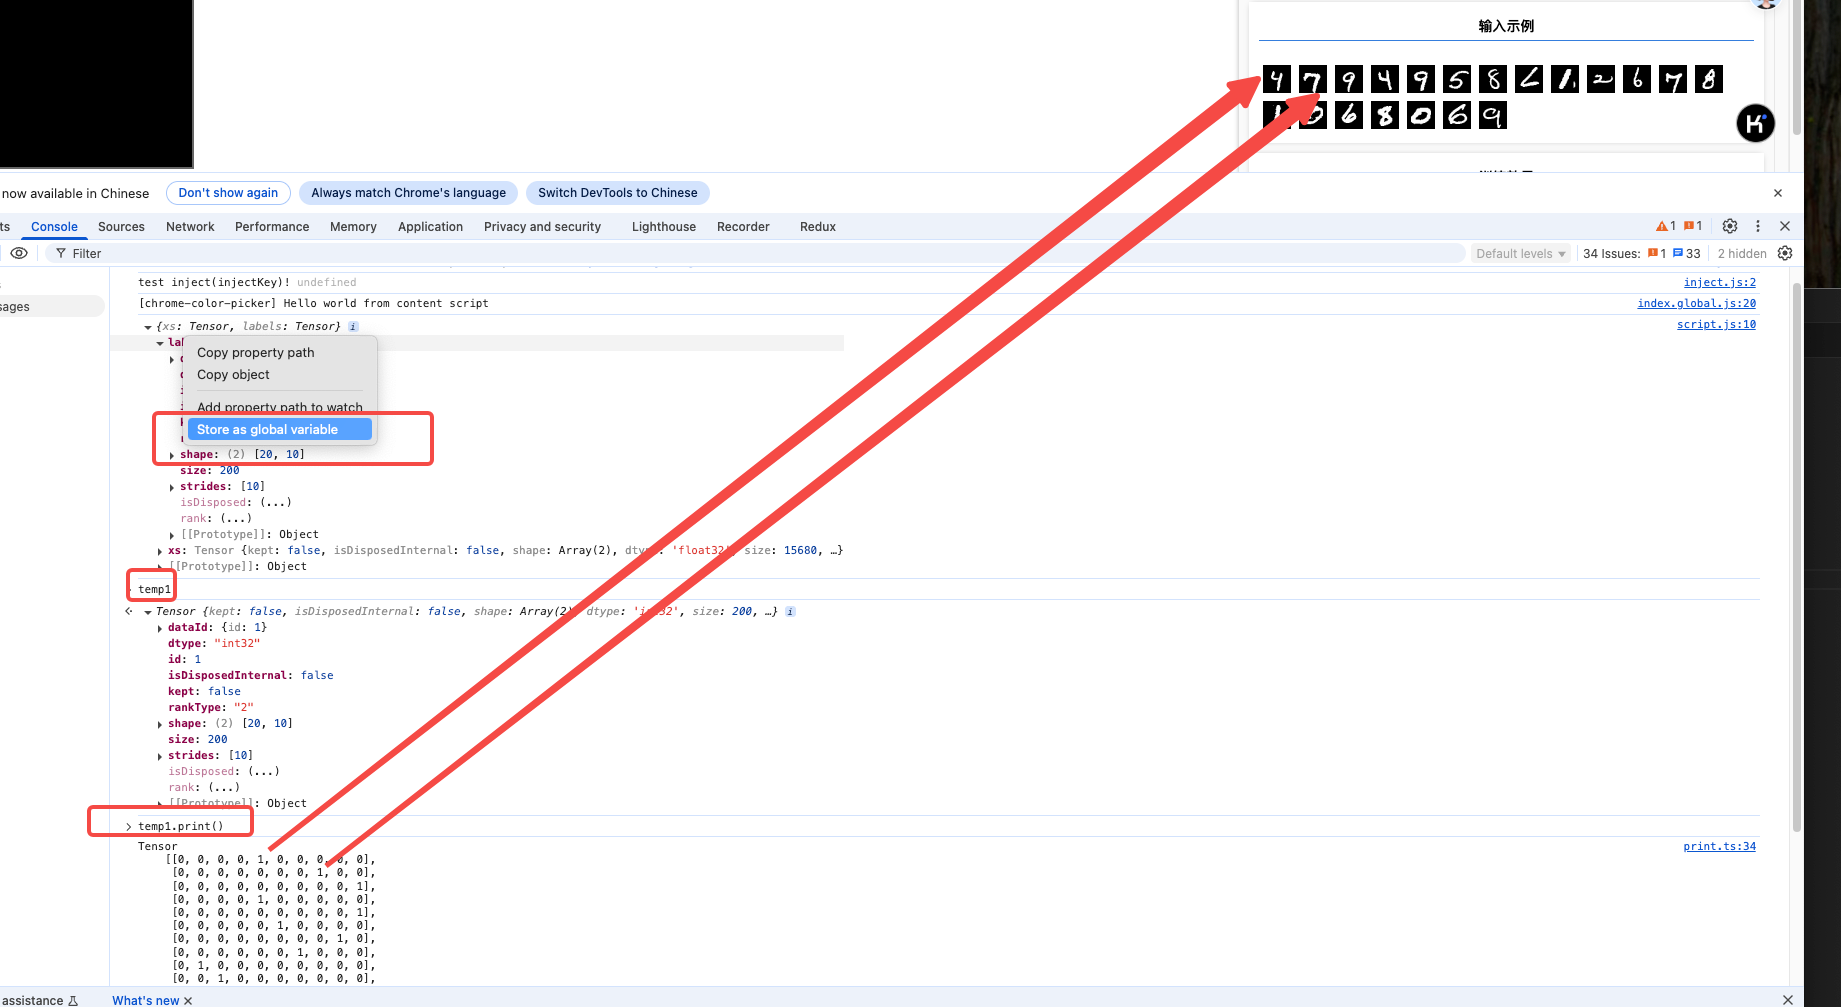
const examples = data.nextTestBatch(20);

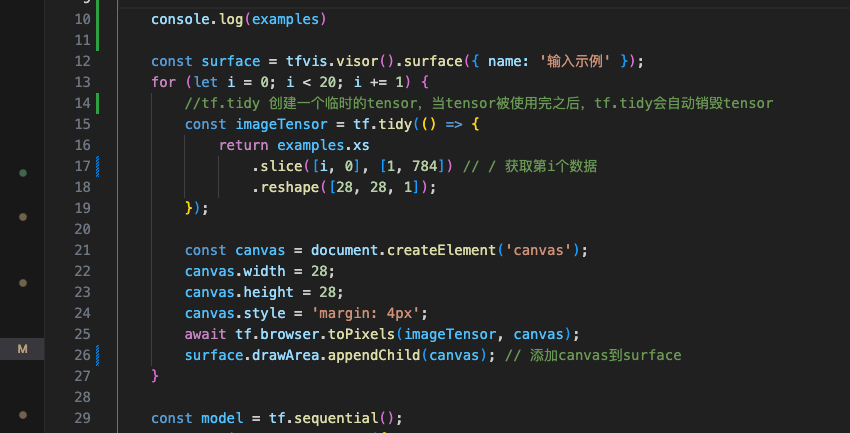
console.log(examples)

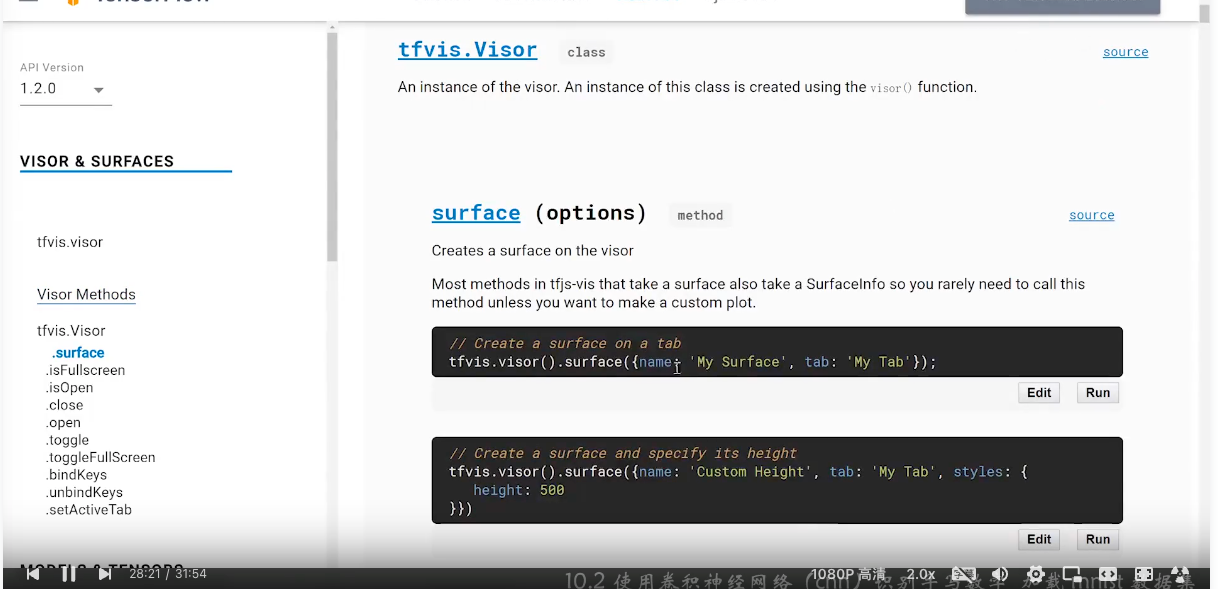
const surface = tfvis.visor().surface({ name: '输入示例' });
for (let i = 0; i < 20; i += 1) {
//tf.tidy 创建一个临时的tensor,当tensor被使用完之后,tf.tidy会自动销毁tensor
const imageTensor = tf.tidy(() => {
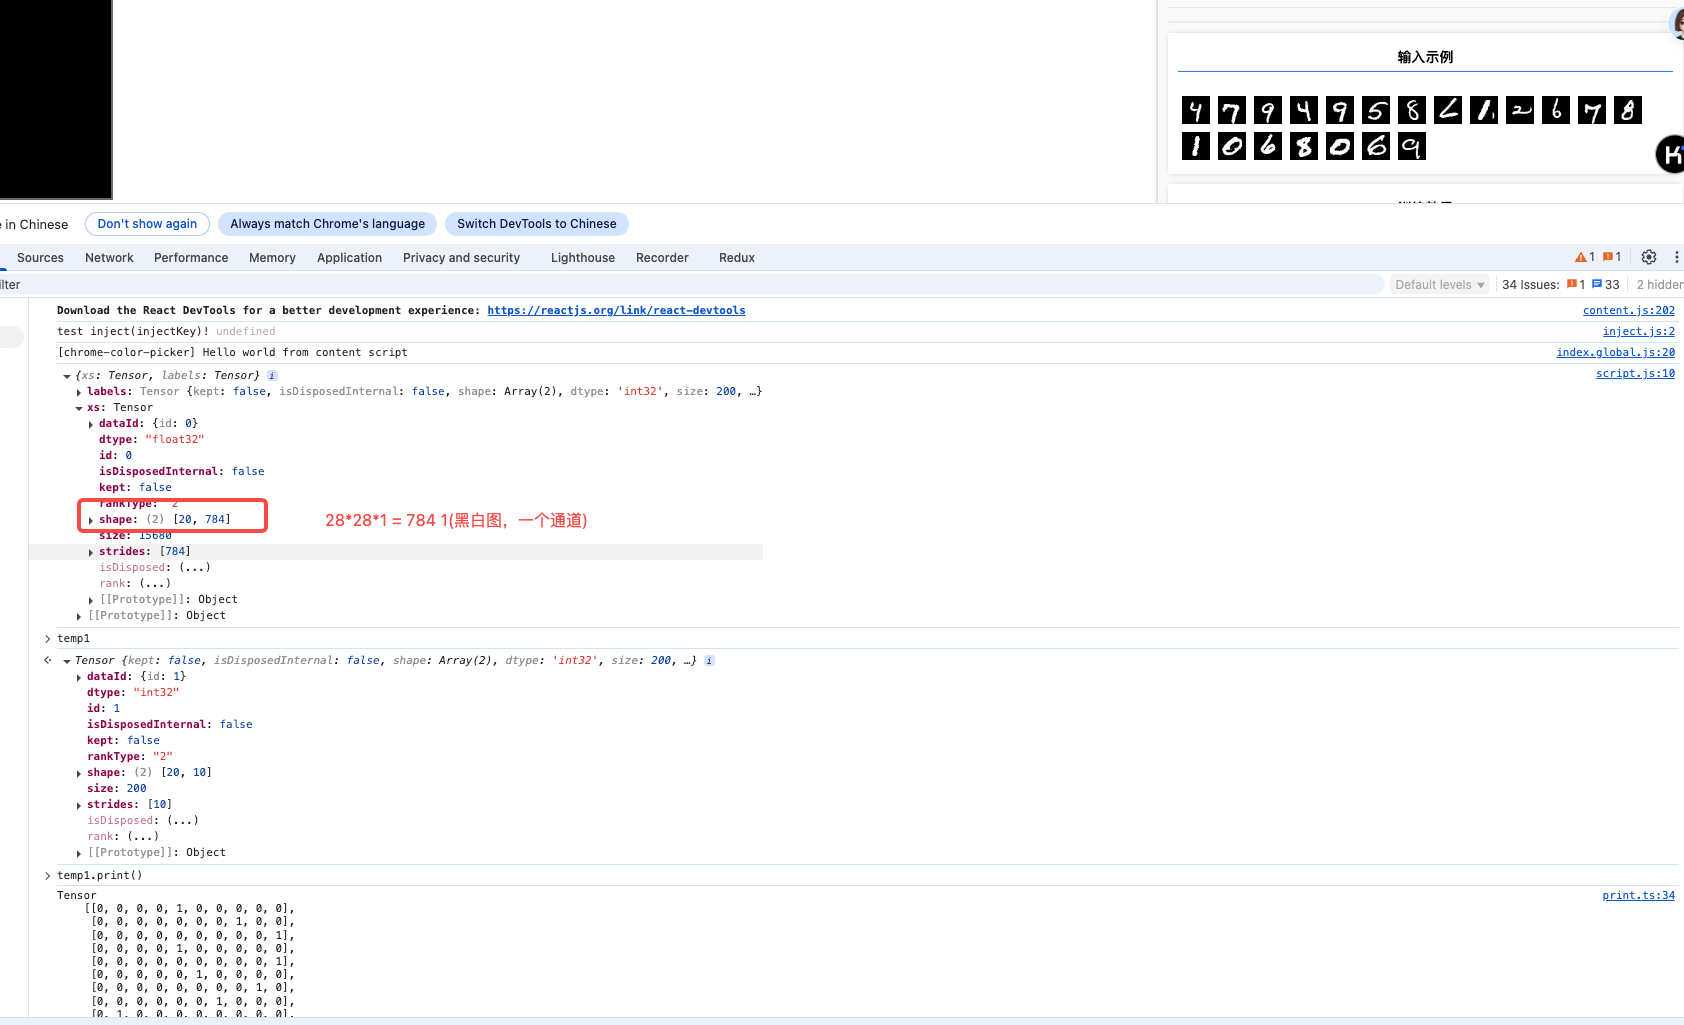
return examples.xs
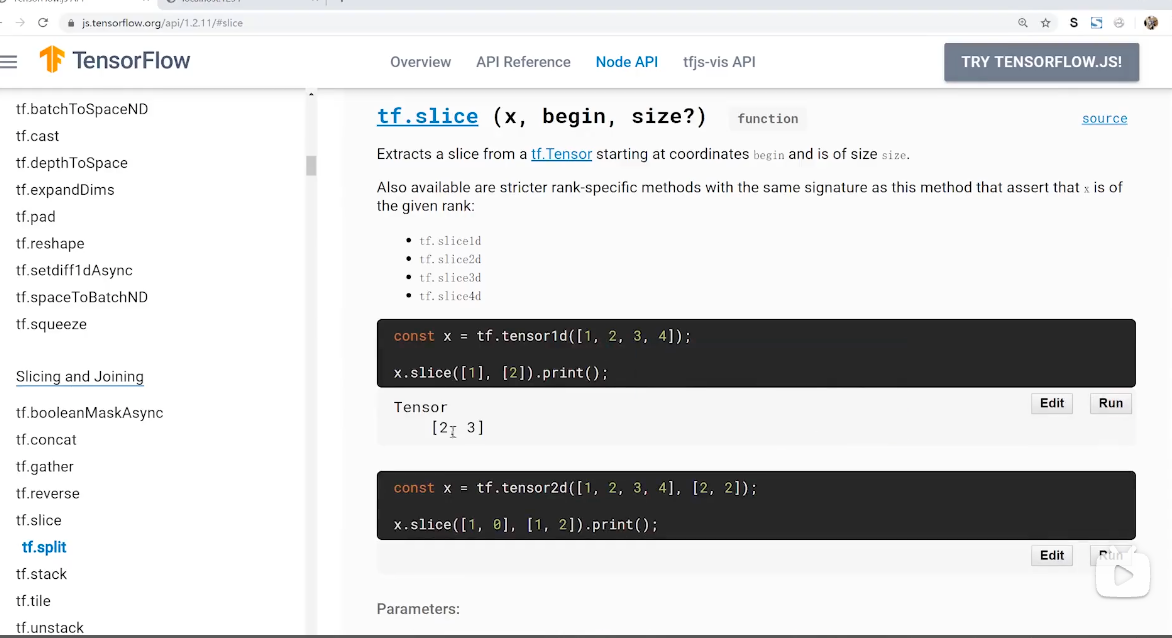
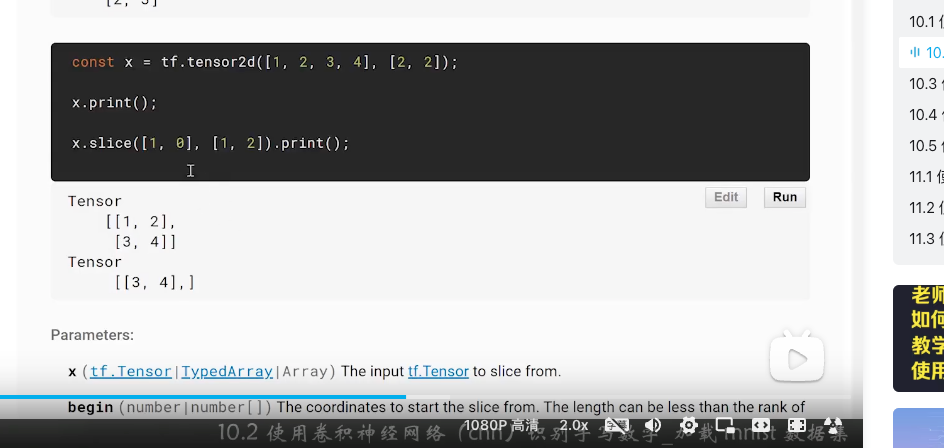
.slice([i, 0], [1, 784]) // / 获取第i个数据
.reshape([28, 28, 1]);
});

const canvas = document.createElement('canvas');
canvas.width = 28;
canvas.height = 28;
canvas.style = 'margin: 4px';
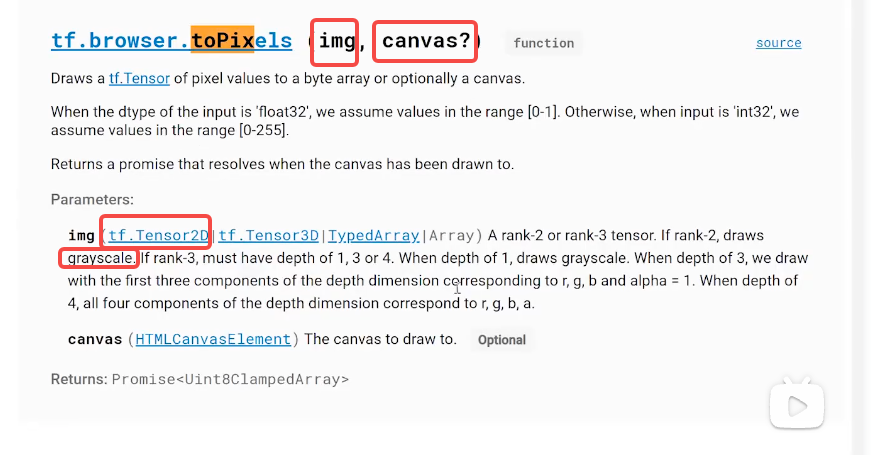
await tf.browser.toPixels(imageTensor, canvas); // 将tensor转为canvas
surface.drawArea.appendChild(canvas); // 添加canvas到surface
}

const model = tf.sequential();
model.add(tf.layers.conv2d({
inputShape: [28, 28, 1],
kernelSize: 5, // 卷积核大小,奇数有中心点
filters: 8, // 卷积核数量,即输出通道数量
strides: 1, // 步长,即卷积核滑动的步长
activation: 'relu',
kernelInitializer: 'varianceScaling' // 初始化权重的函数,这里使用varianceScaling,即权重初始化为0,方差为1
}));

// 池化层,将输入的图片缩小,即缩小图片的分辨率,但图片内容不变
model.add(tf.layers.maxPool2d({
poolSize: [2, 2], // 池化核大小
strides: [2, 2] // 滑动步长
}));
model.add(tf.layers.conv2d({
kernelSize: 5,
filters: 16,
strides: 1,
activation: 'relu',
kernelInitializer: 'varianceScaling'
}));
model.add(tf.layers.maxPool2d({
poolSize: [2, 2],
strides: [2, 2]
}));
model.add(tf.layers.flatten()); // 展平,将二维数组变为一维数组

model.add(tf.layers.dropout({ rate: 0.9 })); // 防止过拟合,随机丢弃一些神经元

model.add(tf.layers.dense({
units: 10, // 0-9 10个分类
activation: 'softmax', // 输出为0-9的概率
kernelInitializer: 'varianceScaling' // 权重初始化为0,方差为1
}));


model.compile({
loss: 'categoricalCrossentropy', // 交叉熵损失函数,用于多分类
optimizer: tf.train.adam(), // Adam优化器,用于训练
metrics: ['accuracy'] // 准确率
});

const [trainXs, trainYs] = tf.tidy(() => {
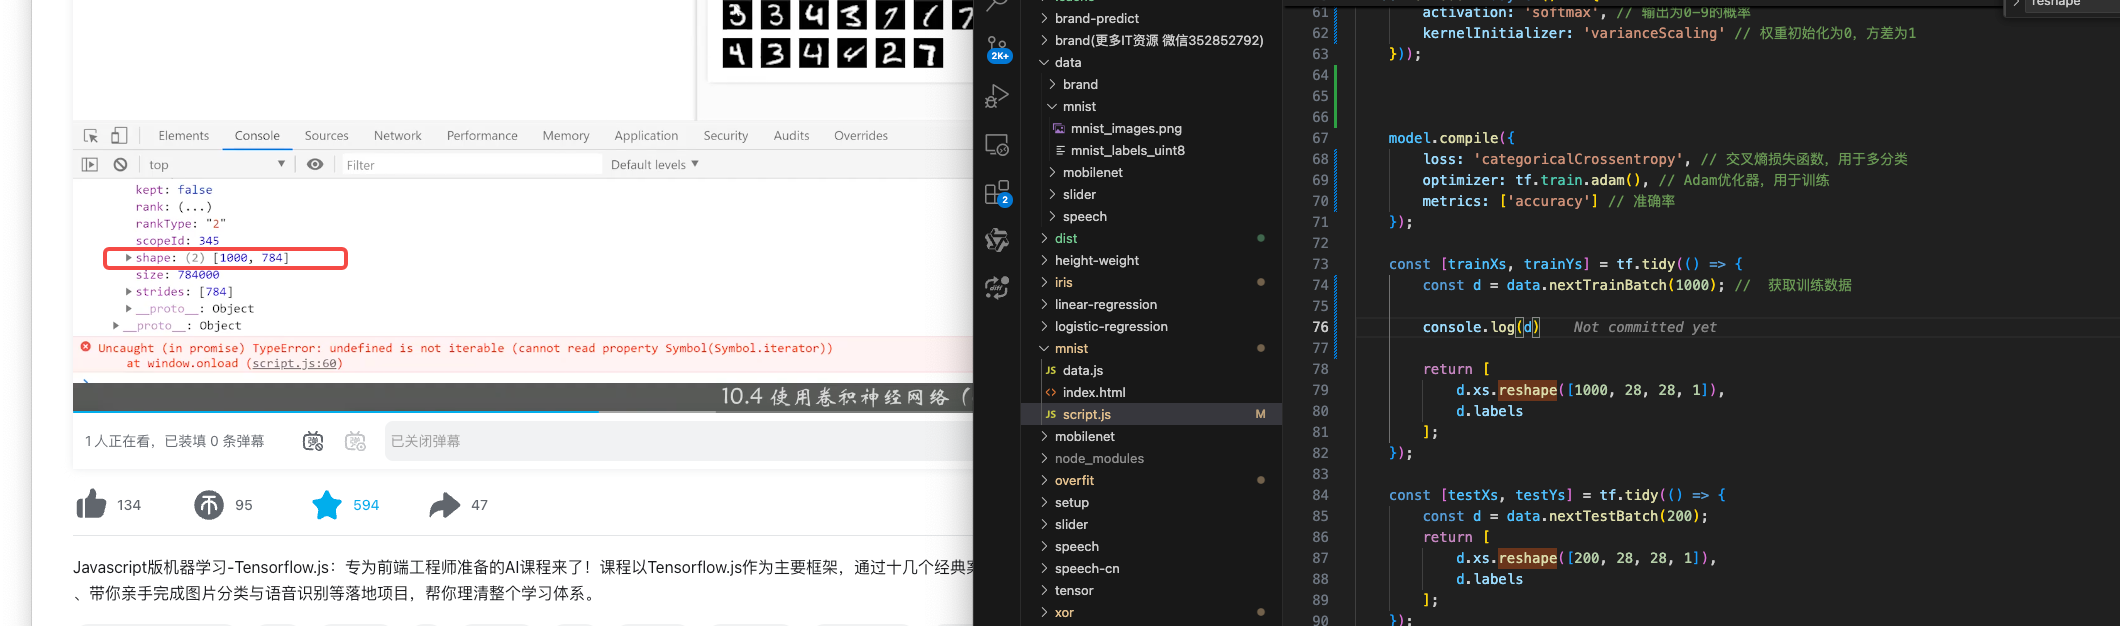
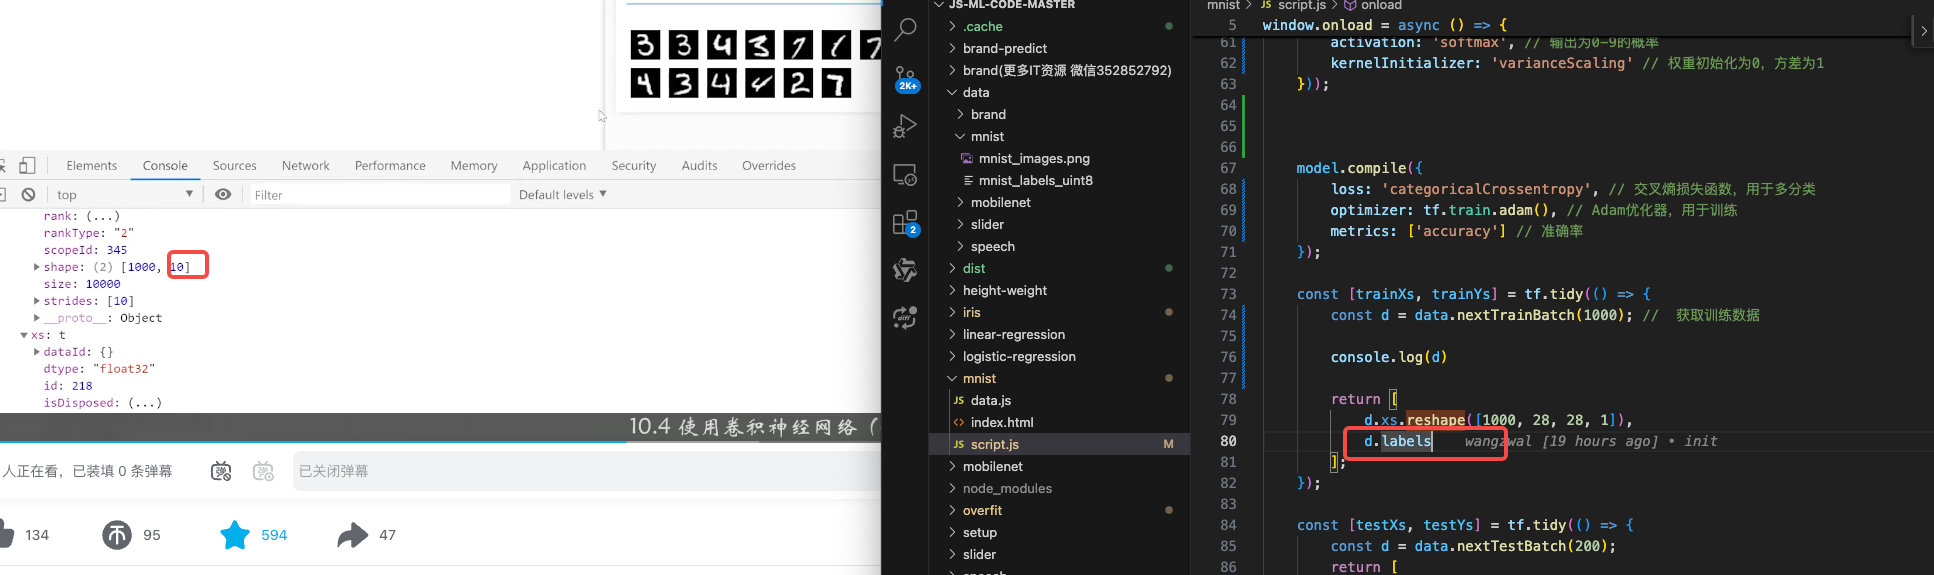
const d = data.nextTrainBatch(1000); // 获取训练数据 1000个训练数据

console.log(d)

return [
d.xs.reshape([1000, 28, 28, 1]),
d.labels
];
});

const [testXs, testYs] = tf.tidy(() => {
const d = data.nextTestBatch(200); // 获取测试数据
return [
d.xs.reshape([200, 28, 28, 1]),
d.labels
];
});

await model.fit(trainXs, trainYs, {
validationData: [testXs, testYs],
batchSize: 50,
epochs: 100,
callbacks: tfvis.show.fitCallbacks(
{ name: '训练效果' },
['loss', 'val_loss', 'acc', 'val_acc'],
{ callbacks: ['onEpochEnd'] }
)
});

const canvas = document.querySelector('canvas');

canvas.addEventListener('mousemove', (e) => {
if (e.buttons === 1) { // 左键按下
const ctx = canvas.getContext('2d');
ctx.fillStyle = 'rgb(255,255,255)'; // 白色
ctx.fillRect(e.offsetX, e.offsetY, 25, 25); // 画一个25*25的矩形
}
});

window.clear = () => {
const ctx = canvas.getContext('2d');
ctx.fillStyle = 'rgb(0,0,0)'; // 黑色
ctx.fillRect(0, 0, 300, 300); // 填充一个黑色
};

clear();

window.predict = () => {
const input = tf.tidy(() => {
return tf.image.resizeBilinear( // 缩放图片
tf.browser.fromPixels(canvas), // 缩放图片
[28, 28], // 缩放后的大小
true // 是否保持图片的宽高比
).slice([0, 0, 0], [28, 28, 1]) // 将彩色图片转换为黑白图片 获取图片的像素
.toFloat() // 转换为浮点数
.div(255) // 转换为0-1
.reshape([1, 28, 28, 1]); // 转换为张量
});
const pred = model.predict(input).argMax(1);
alert(`预测结果为 ${pred.dataSync()[0]}`);
};
};

index.html

1
2
3
4
5
6
<script src="script.js"></script>
<canvas width="300" height="300" style="border: 2px solid #666;"></canvas>
<br>
<button onclick="window.clear();" style="margin: 4px;">清除</button>
<button onclick="window.predict();" style="margin: 4px;">预测</button>